Quantified Tasks in Jira
Jira is by and away one of the most popular issue tracking systems in software engineering. It has decent support for Quantified Tasks via custom fields and automation.
You can set up Quantified Tasks with either company-managed projects (strongly suggested!) or team-managed projects.
Option 1: Company-managed Project
If you have access to the system-wide settings for Jira, you should strongly consider setting up Quantified Tasks there. This will ensure that it is used consistently across all company-managed projects.
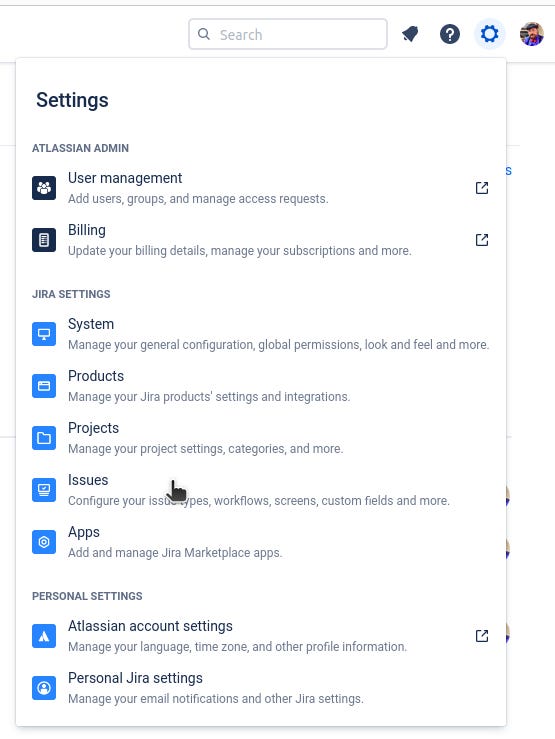
To access these settings, click the Gear icon in the upper-right, and click Issues.
Issue Types
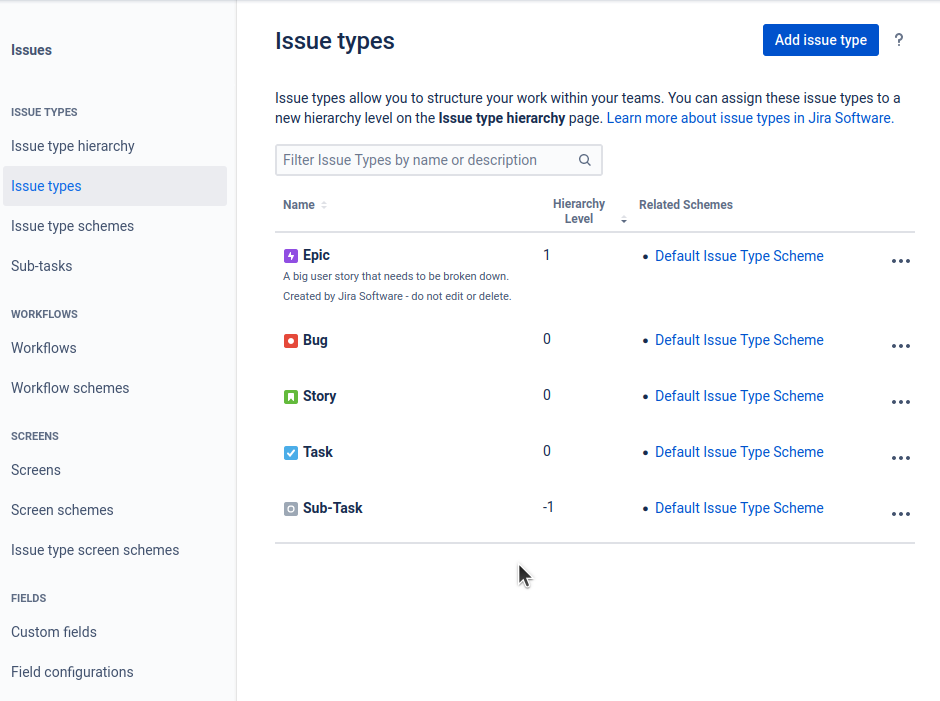
Select “Issue types”. We strongly recommend the following task types at a minimum:
Epic
Hierarchy Level: 1
Story
Hierarchy Level: 0
Bug
Hierarchy Level: 0
Task
Hierarchy Level: 0
Subtask
Hierarchy Level: -1
If your team prefers to use different names for these, or wants additional types, that is fine. Just understand how your preferred issue types map to these basic types.
Priority = Status
The Priority measure in Quantifed Tasks maps to the Workflow and Status in Jira. The best way to set this up is to create a new Workflow and set it as the active and default workflow for your Jira instance.
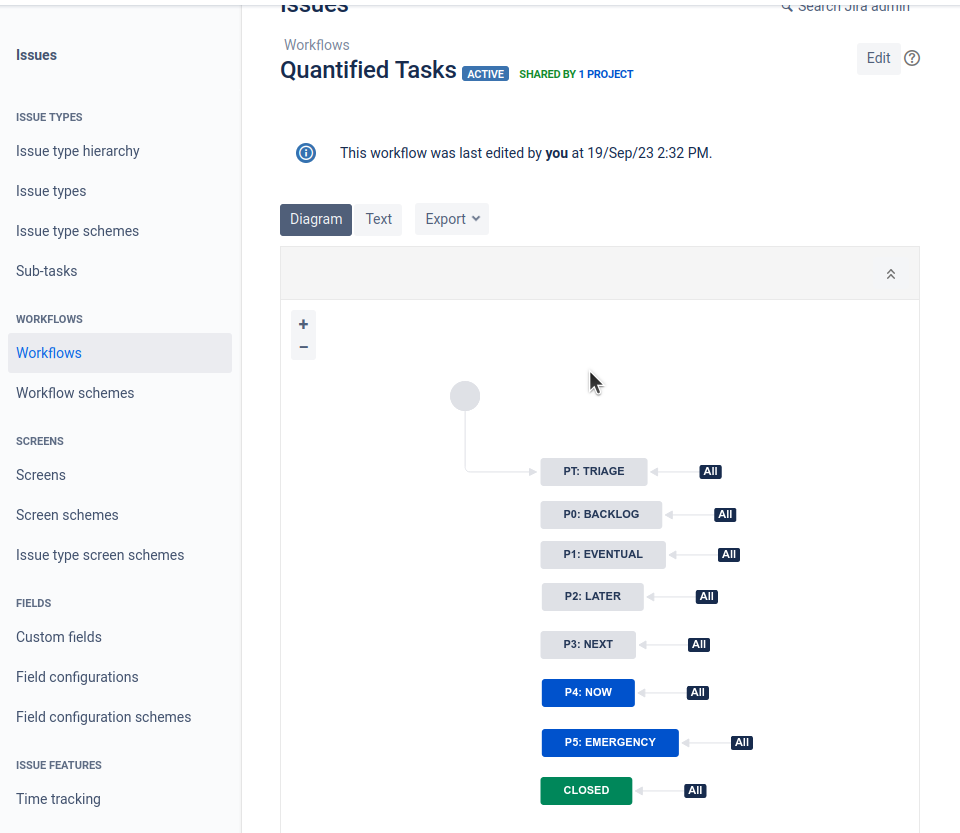
Go to “Workflows” and “Add workflow”. Select “Create New” and name the workflow “Quantified Tasks”.
Create the following steps. We recommend allowing free transition between all states, although you may choose to set up transitions if you like.
pT: Triage
Description: Determine priority.
Category: To Do
p0: Backlog
Description: Not selected for work.
Category: To Do
p1: Eventual
Description: Not currently planned for the current or next sprint.
Category: To Do
p2: Later
Description: Will likely be included in next sprint. May be pulled into the current sprint if time permits.
Category: To Do
p3: Next
Description: Should be completed in the current sprint.
Category: To Do
p4: Now
Description: Currently being worked on.
Category: In Progress
p5: Emergency
Description: Reserved for escalating a Task above all other priorities; “drop everything and do this now!”
Category: In Progress
Closed
Category: Done
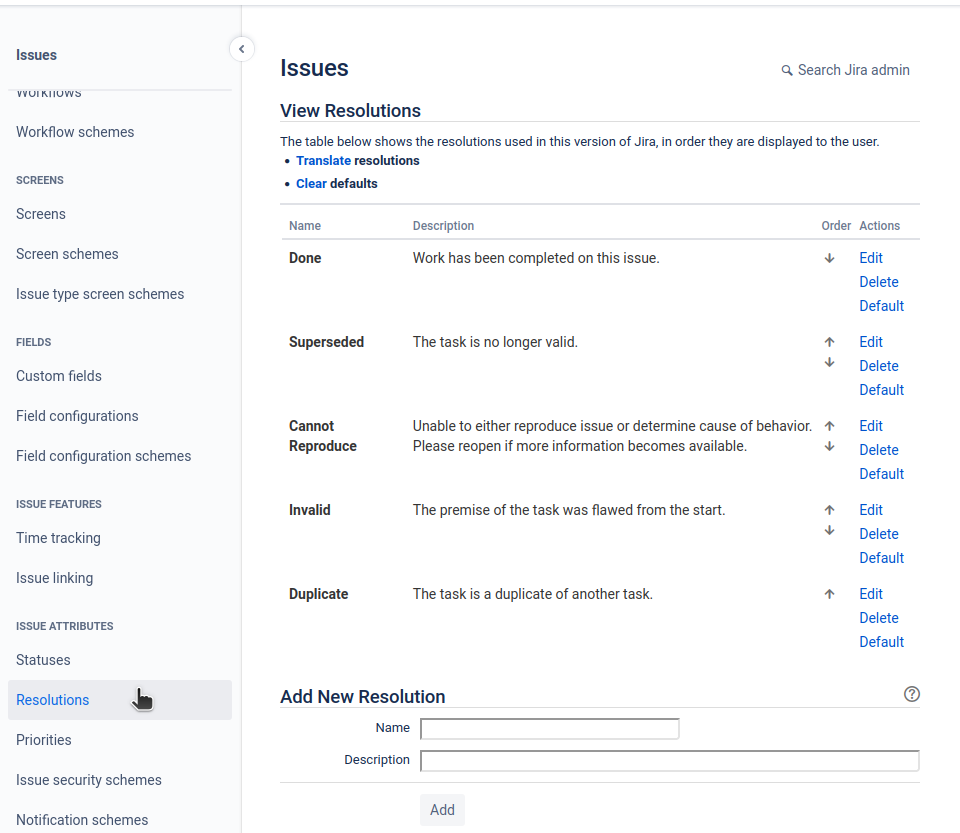
Once you’ve set up your Workflow, go to the “Resolutions” section of Jira admin and ensure you have at least the following resolutions:
Done: The task satisfies the Definition of Done.
Superseded: The task is no longer valid.
Duplicate: The task is a duplicate of another task.
Cannot Reproduce: Unable to either reproduce issue or determine cause of behavior. Please reopen if more information becomes available.
Invalid: The premise of the task was flawed from the start.
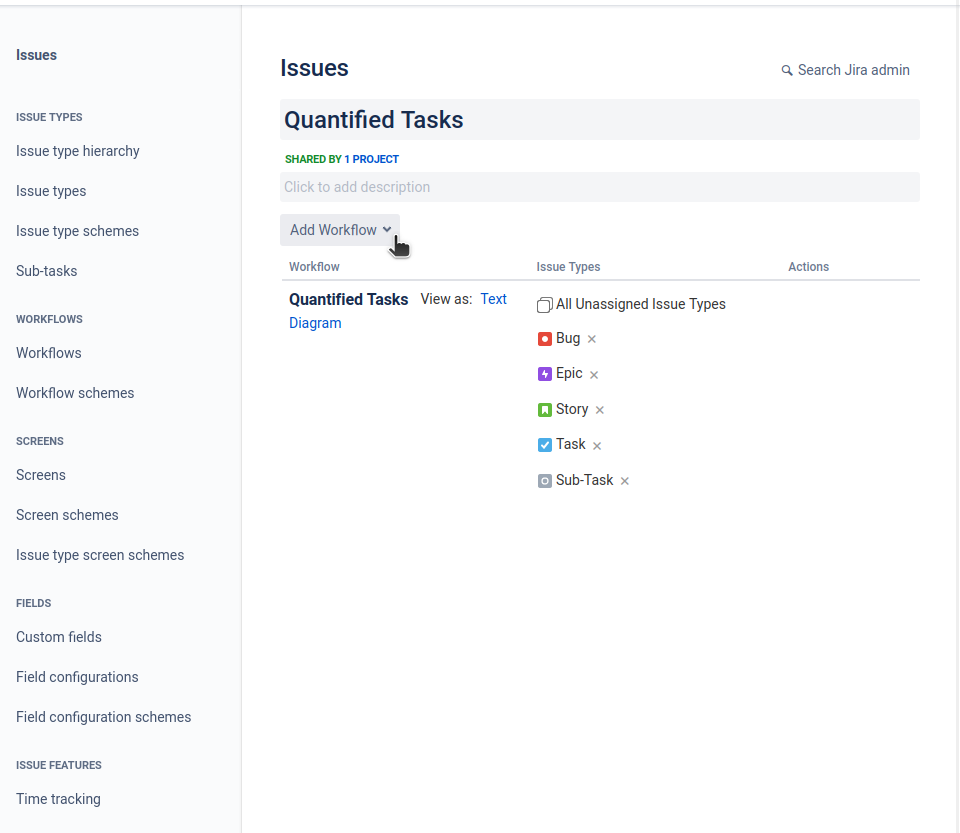
Next, go to “Workflow schemes” and create a new scheme. Call it “Quantified Tasks”. Select “Add Workflow” and “Add Existing”, then select Quantified Tasks and click “Next”. Check all issue types and click “Finish”.
Gravity = Priorities
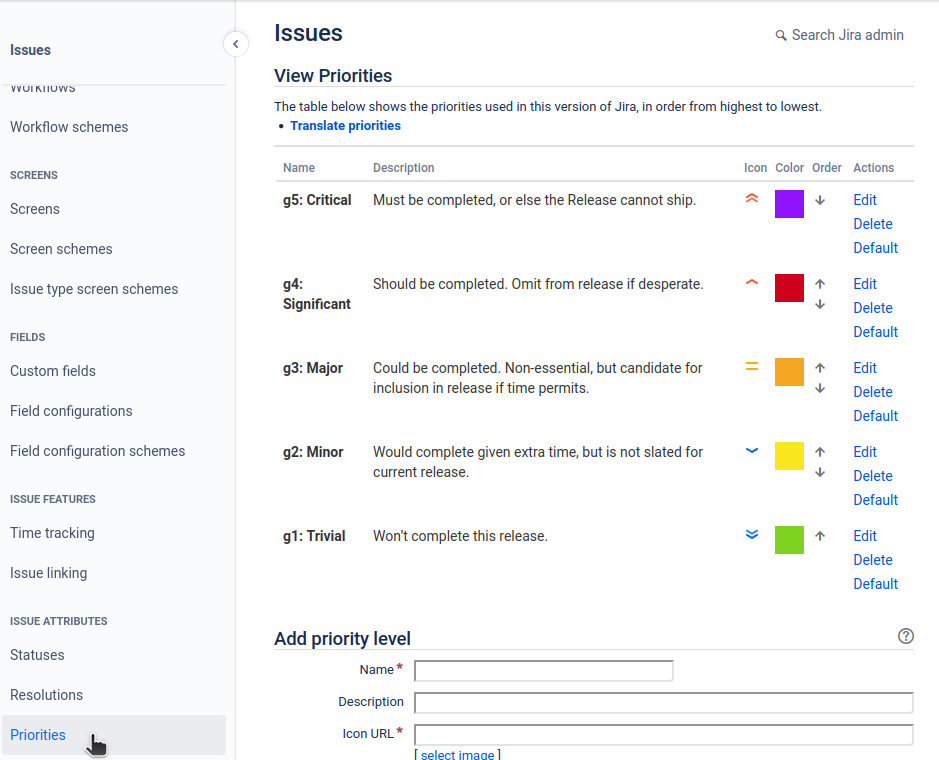
Jira’s Priority maps to Quantified Task’s Gravity. You can configure this from the “Priorities” section. You should set these as follows:
g5: Critical
Description: Must be completed, or else the Release cannot ship.
Icon URL: /images/icons/priorities/highest.svg
Priority Color: #9013FE
g4: Significant
Description: Should be completed. Omit from release if desperate.
Icon URL: /images/icons/priorities/high.svg
Priority Color: #D0021B
g3: Major
Description: Could be completed. Non-essential, but candidate for inclusion in release if time permits.
Icon URL: /images/icons/priorities/medium.svg
Priority Color: #F5A623
g2: Minor
Description: Would complete given extra time, but is not slated for current release.
Icon URL: /images/icons/priorities/low.svg
Priority Color: #F8E71C
g1: Trivial
Description: Won’t complete this release.
Icon URL: /images/icons/priorities/lowest.svg
Priority Color: #7ED321
Impact
Jira’s Impact field was originally created to track “the effect of an incident on a business' processes”. This makes it reasonably analogous to the Impact measure in Quantified Tasks. To edit this at a global level, go to “Custom Fields”, find “Impact”, and click the three dots at the far end of the row. Select “Contexts and Default value”.
From that page, select “Edit Options”, and modify them to be as follows:
i5: Massive
i4: Significant
i3: Major
i2: Minor
i1: Slight
Select “Done”. Now click “Edit context”. Set the Description to: “The importance of a Task to the Solution as a whole, with an emphasis on the effect on users.”
Under “Issue types”, select all types. Click “Modify” to save changes.
Also ensure the default Impact is set to “None”.
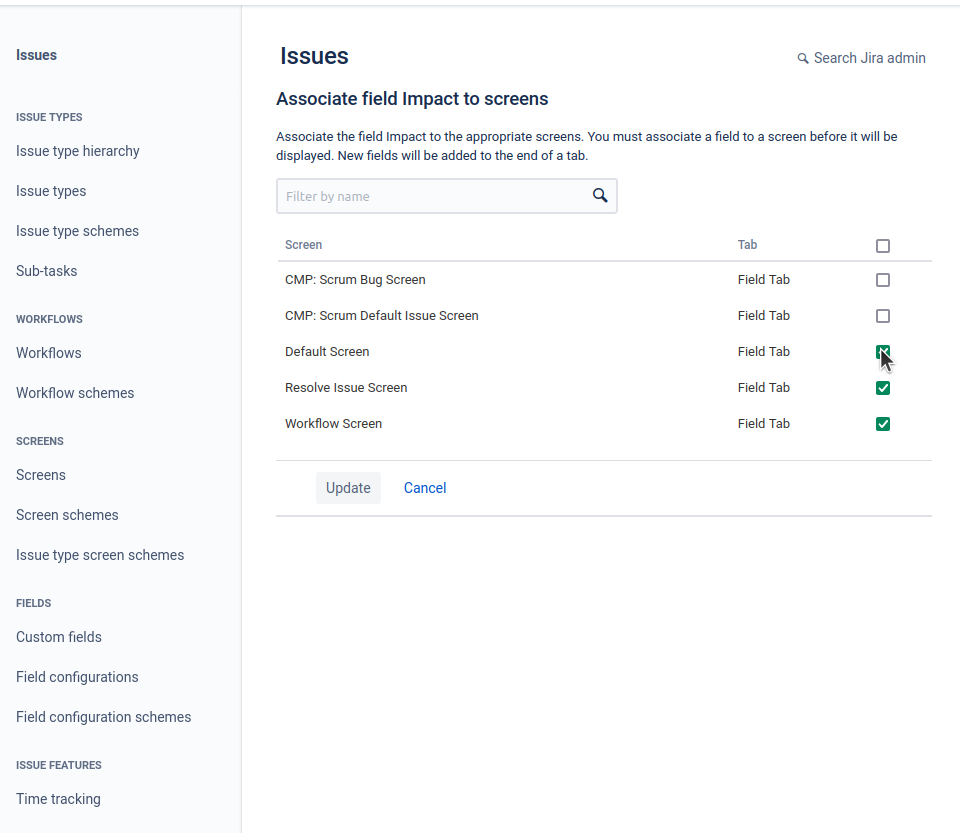
Back on the custom field list, find “Impact” again and click the three dots. Click “Associate to Screens”, and select the following:
Default Screen
Resolve Issue Screen
Workflow Screen
If you have other screens that you will continue to use, consider adding it there too.
Click “Update”.
Estimation Measures
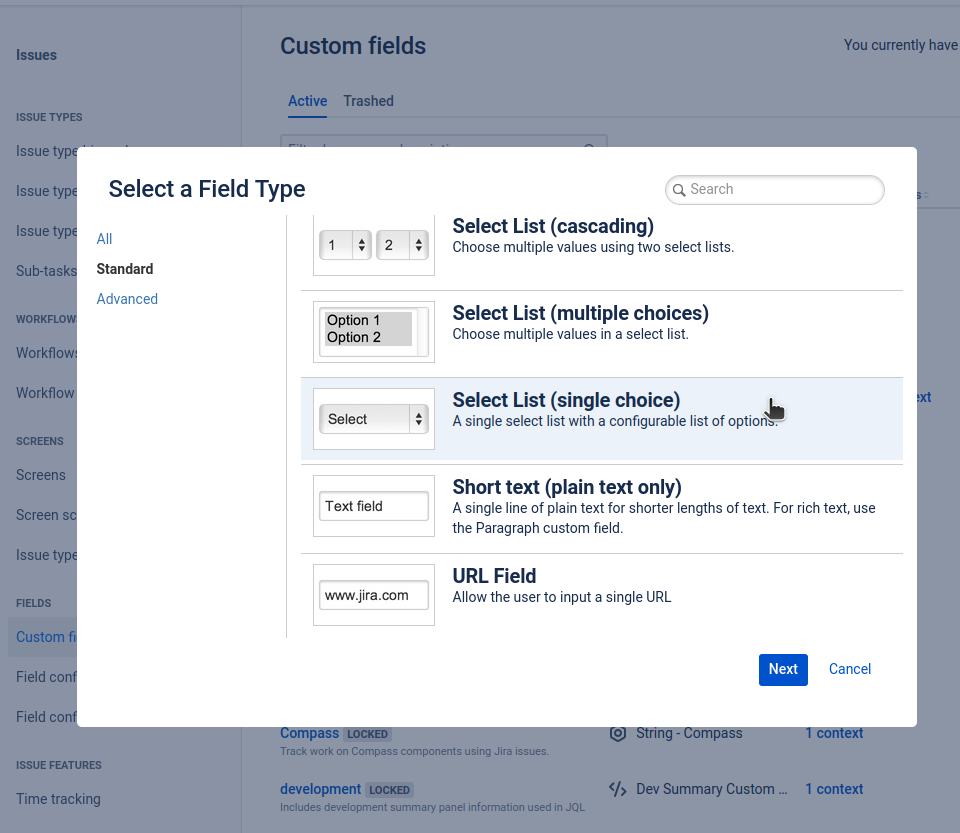
The three Estimation measures must be defined from “Custom fields”. For each, click “Create custom field” and create a “Select List (single choice)” field.
Distance
Description: The estimated time to complete if you knew everything.
Options:
d1: Within day
d2: Within quarter sprint
d3: Within half sprint
d4: Within sprint
d5: Exceeds sprint
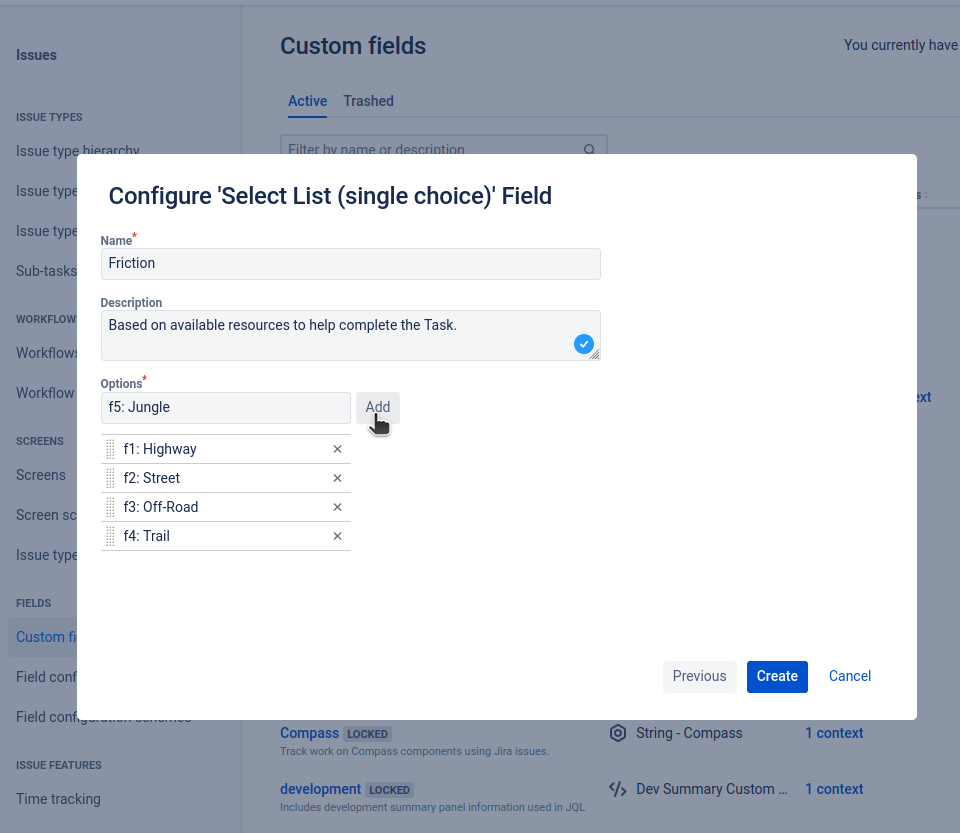
Friction
Description: Based on available resources to help complete the Task.
Options:
f1: Highway
f2: Street
f3: Off-Road
f4: Trail
f5: Jungle
Relativity
Description: How much uncertainty, or "flux," is in the Task.
Options:
r1: Trivial Flux
r2: Low Flux
r3: Moderate Flux
r4: Significant Flux
r5: Total Flux
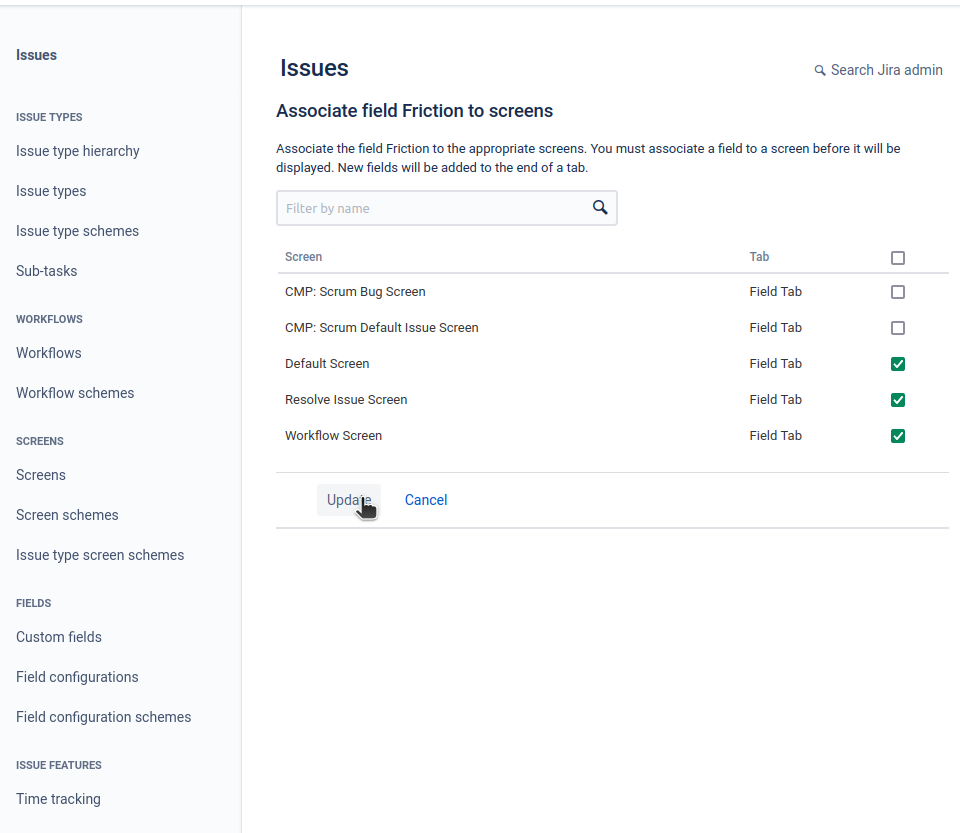
Click “Create”. When prompted, assign the custom field to at least the Default Screen and Workflow Screen; consider adding it to any other screens you’ve created to view or edit open issues.
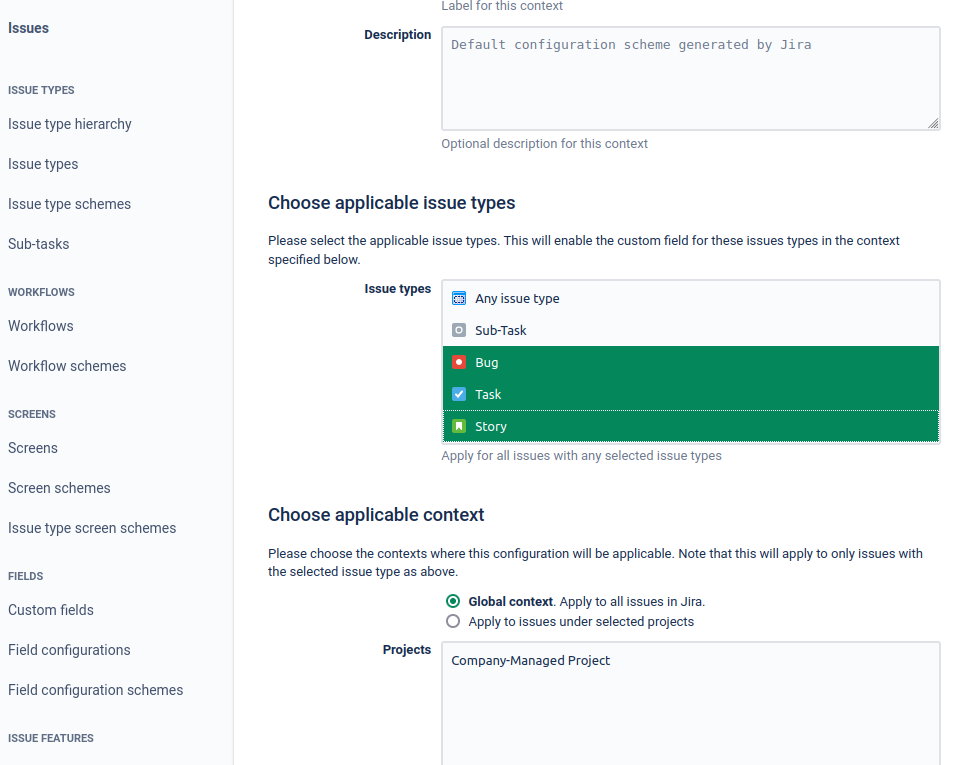
For all three, find them on the “Custom fields” list, click the three dots, and select “Context and Default value”. Click “Edit Context”. Under “Choose applicable issue types”, select the following issue types (Ctrl+Click)
Bug
Task
Story
Subtask
In the “Custom fields” list, you should also locate “Story Points”. Click the three dots and select “Edit Field”, and change the name to “Energy Points”, then click “Update”. Once again from the list of custom fields, click the three dots and select “Context and Default value”. Click “Edit Context”, and under “Choose applicable issue types”, select the same issue types as with the three estimation measures above.
Back on the custom field list, find “Energy Points” again and click the three dots. Click “Associate to Screens”, and select all your screens. Click “Update”.
Stability Measures
Origin
Description: The phase at which the issue was introduced.
Options:
o1: Planning
o2: Design
o3: Implementation
o4: Verification
o5: Production
Caught
Description: The phase at which the issue was first detected.
Options:
c1: Planning
c2: Design
c3: Implementation
c4: Verification
c5: Production
For both Origin and Caught, we want to set a default value. Find them on the “Custom fields” list, click the three dots, and select “Context and Default value”. Click “Edit Default Value”, and select the highest value for the measure. This ensures that if either is not defined, the Volatility will be high. Then click “Done”.
While still editing “Context and Default value” for each, click “Edit Context”. Under “Choose applicate issue types”, select “Bug” and click “Modify”. This ensures that Origin and Caught only appear on Bugs.
Finally, we need to add a Volatility field. From “Custom fields”, click “Create custom field” and select “Number Field”. Set the name to “Volatility”, and click “Create”. Check the boxes for “Default Screen”, “Resolve Issue Screen”, and “Workflow Screen” — you may also include other screens you use — and then click “Update”.
Automation
To automatically calculate Energy Points and Volatility, from the gear menu in the upper-right corner of Jira, select “System”.
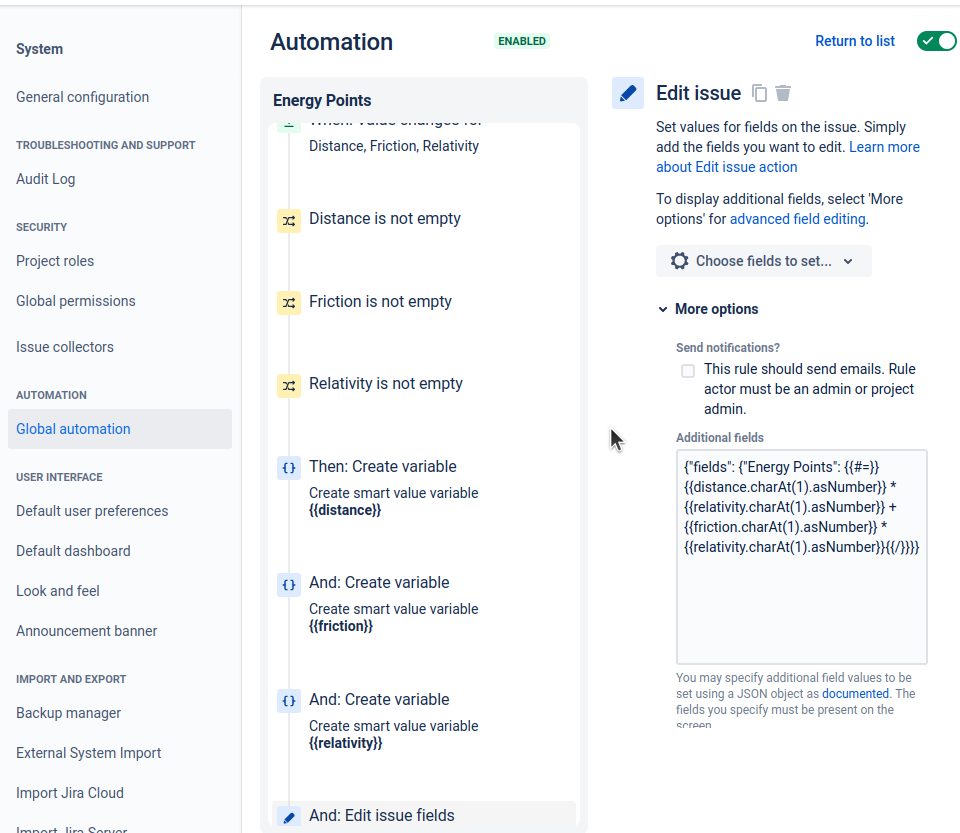
Energy Points
Under Automation, click “Create rule”.
WHEN: Field value changed for:
Fields to monitor for changes: Distance, Friction, Relativity
Change type: Any changes to the field value
IF: Add a condition
Issue fields condition
Field: Distance
Condition: is not empty
Issue fields condition
Field: Friction
Condition: is not empty
Issue fields condition
Field: Relativity
Condition: is not empty
THEN: Add an action
Create variable
Variable name: distance
Smart value: {{issue.Distance}}
Create variable
Variable name: friction
Smart value: {{issue.Friction}}
Create variable
Variable name: relativity
Smart value: {{issue.Relativity}}
Edit issue
Additional fields: (Set to code below)
{"fields": {"Energy Points": {{#=}}{{distance.charAt(1).asNumber}} * {{relativity.charAt(1).asNumber}} + {{friction.charAt(1).asNumber}} * {{relativity.charAt(1).asNumber}}{{/}}}}
Name the automation “Energy Points” and click “Turn it on”.
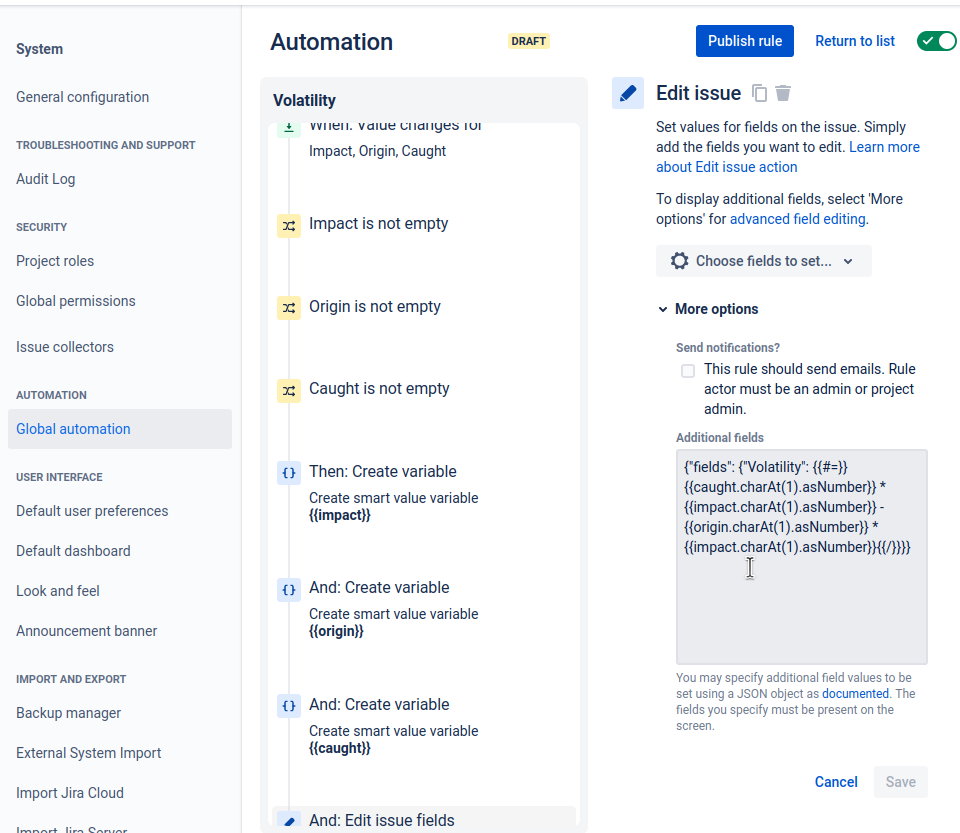
Volatility
Under Automation, click “Create rule”.
WHEN: Field value changed
Fields to monitor for changes: Impact, Origin, Caught
Change type: Any changes to the field value
IF: Add a condition
Issue fields condition
Field: Impact
Condition: is not empty
Issue fields condition
Field: Origin
Condition: is not empty
Issue fields condition
Field: Caught
Condition: is not empty
THEN: Add an action
Create variable
Variable name: impact
Smart value: {{issue.Impact}}
Create variable
Variable name: origin
Smart value: {{issue.Origin}}
Create variable
Variable name: caught
Smart value: {{issue.Caught}}
Edit issue
More options
Additional fields: (Set to code below)
{"fields": {"Volatility": {{#=}}{{caught.charAt(1).asNumber}} * {{impact.charAt(1).asNumber}} - {{origin.charAt(1).asNumber}} * {{impact.charAt(1).asNumber}}{{/}}}}
Name the automation “Volatility” and click “Turn it on”.
Configuring Your Project
You can now use the configuration with any company-managed Jira project. Create a new company-managed Scrum project, or open an existing company-managed project, and go to the Project Settings.
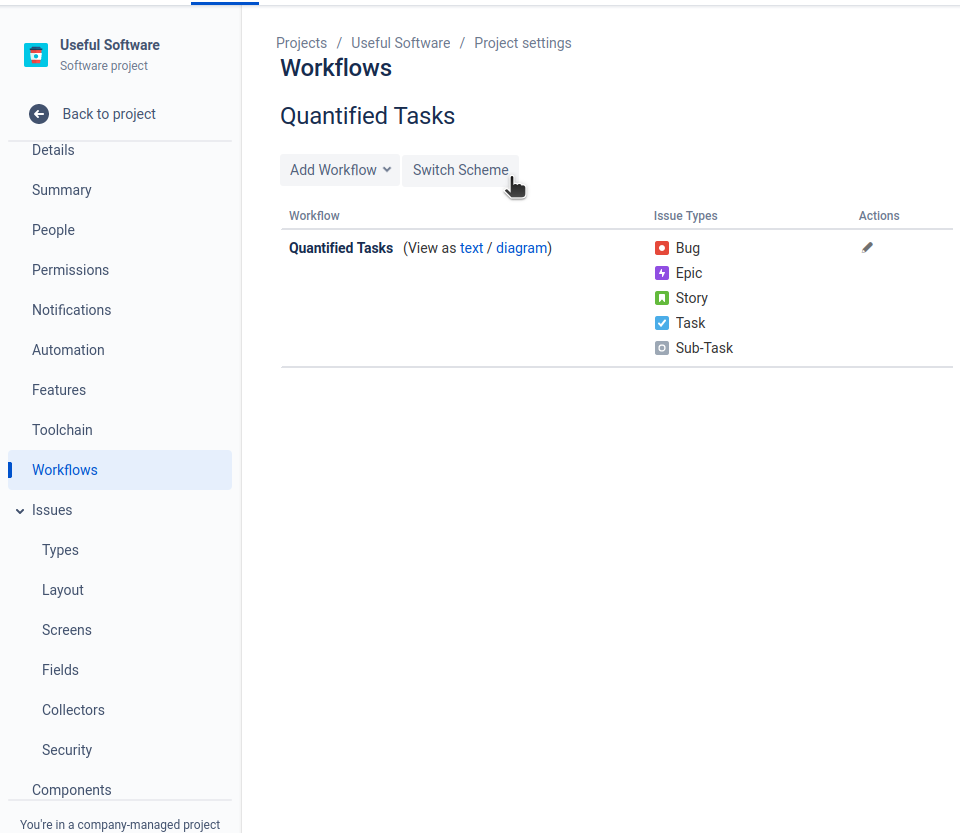
First, select “Workflow” from the left, and then click “Switch Scheme”. Select “Quantified Tasks” and click “Associate”.
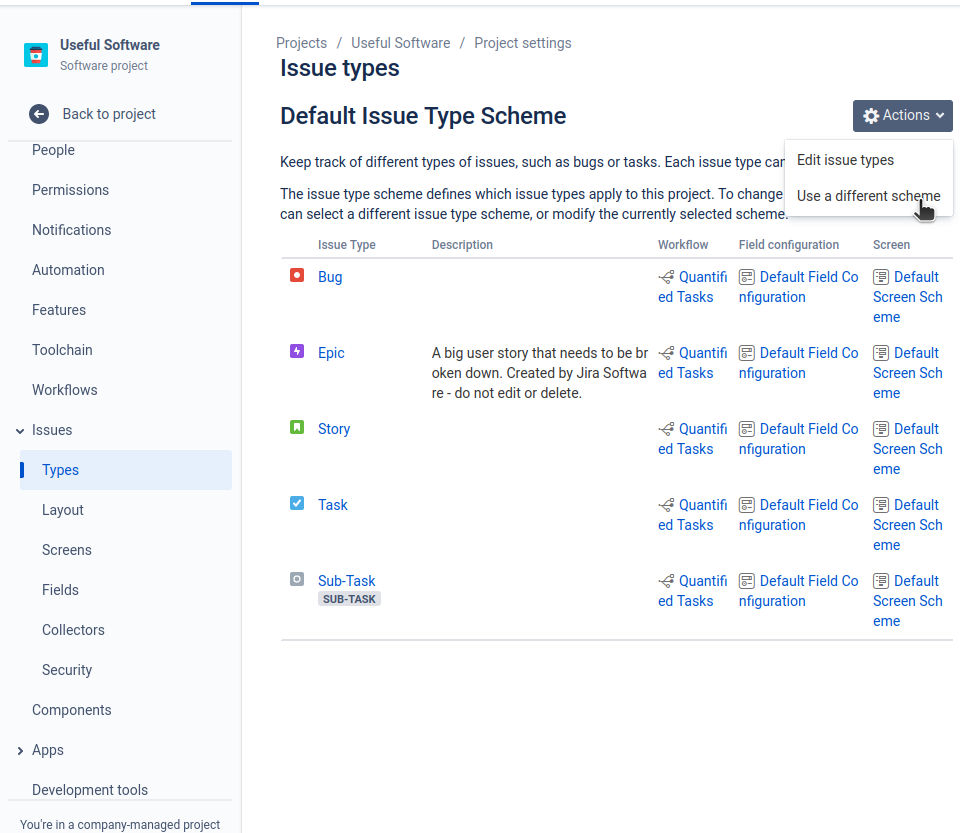
Next, under “Issues” at left, select “Types”. Click “Actions” in the upper-right corner, and select “Use a different scheme”. Select “Default Issue Type Scheme” and click “Associate”.
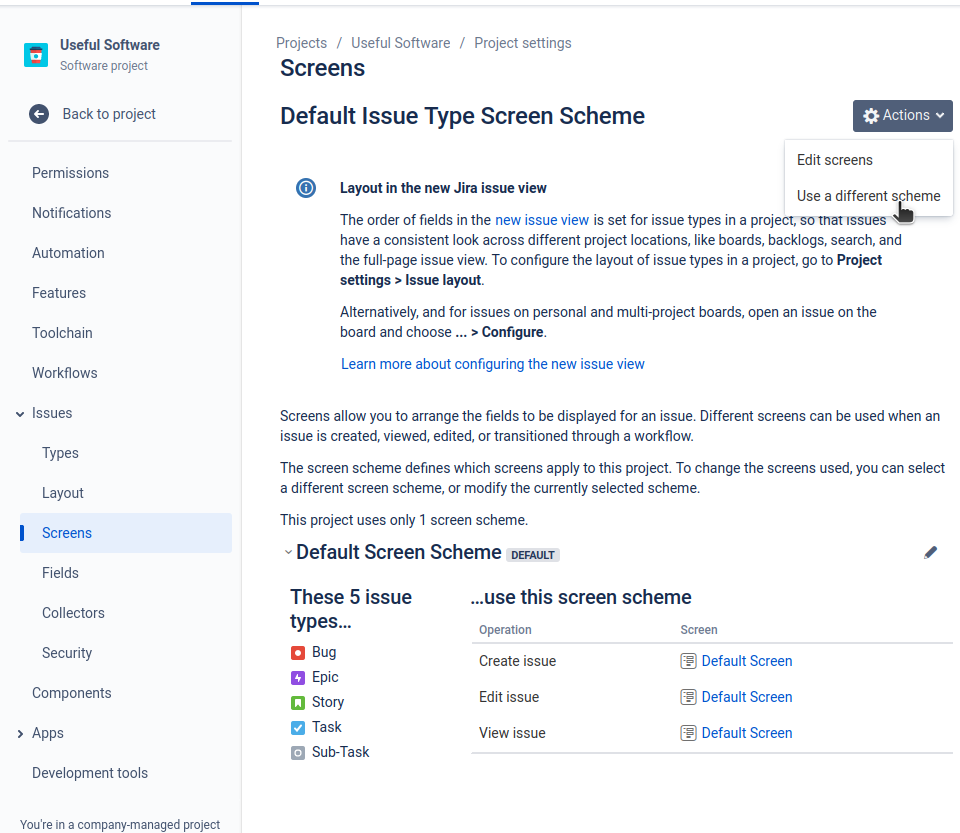
Still under “Issues” at left, select “Screens”. Click “Actions” in the upper-right corner, and select “Use a different scheme”. Select “Default Issue Type Screen Scheme” (or whatever scheme you’ve set up to work with the new Quantified Tasks fields.) Click “Associate”.
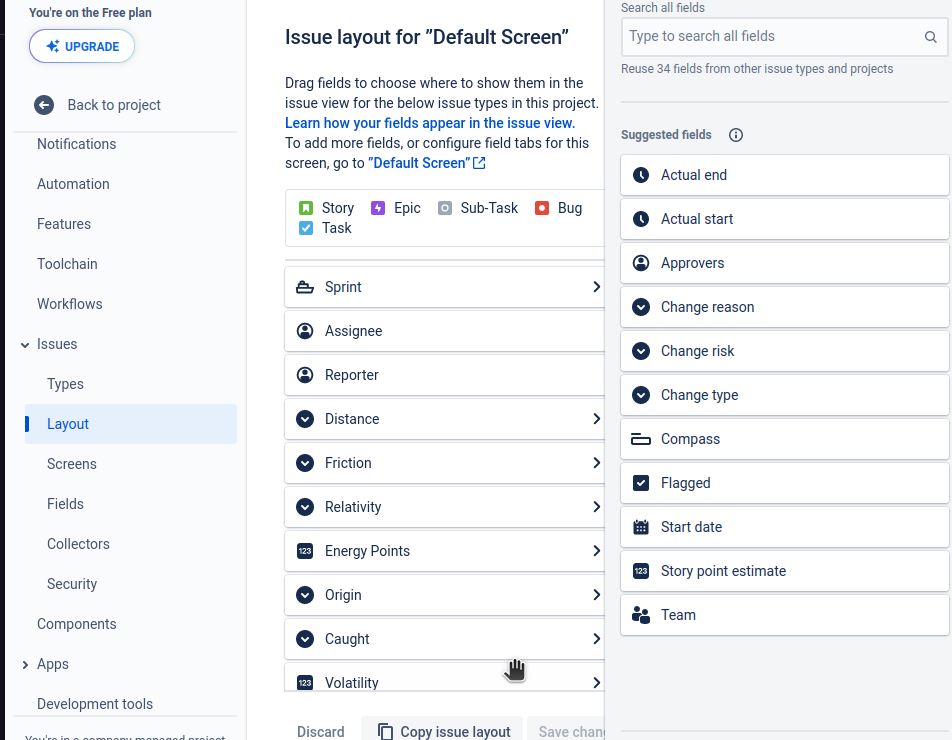
Finally, under “Issues” at left, select “Layout”. Click “Edit Issue Layout” next to your issue types. You can rearrange the layout of issue fields here, but we recommend something like this under Context fields:
Status
Assignee
Sprint
Distance
Friction
Relativity
Energy Points
Origin
Caught
Volatility
Impact
Priority
Fix versions
Labels
The main idea is that we’ve grouped fields: Sprint Plan, Estimate, Stability, Release Plan. Of course, you can tweak this to your team’s needs.
Backlog Board Configuration
On your Jira project, go to “Backlog” and click the three dots in the upper-right. Select “Board Settings”, and “Columns”.
Create the following columns and associate the statuses:
Backlog
p2: Later
p1: Eventual
p0: Backlog
pT: Triage
Selected
p3: Next
In Progress
p5: Emergency
p4: Now
Done
Closed
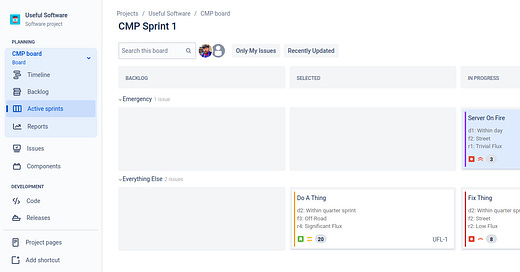
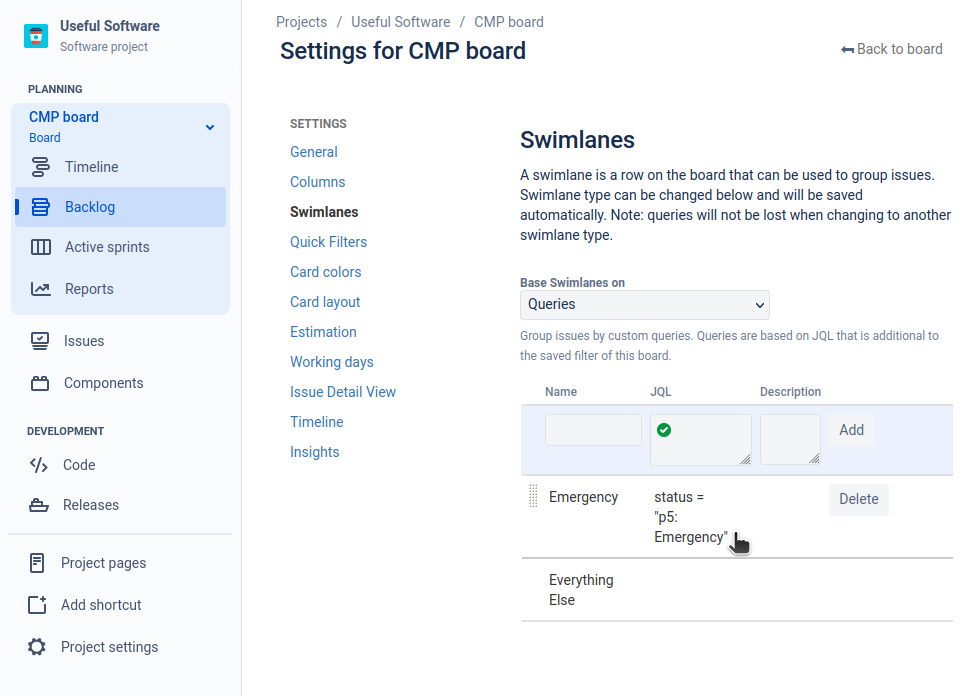
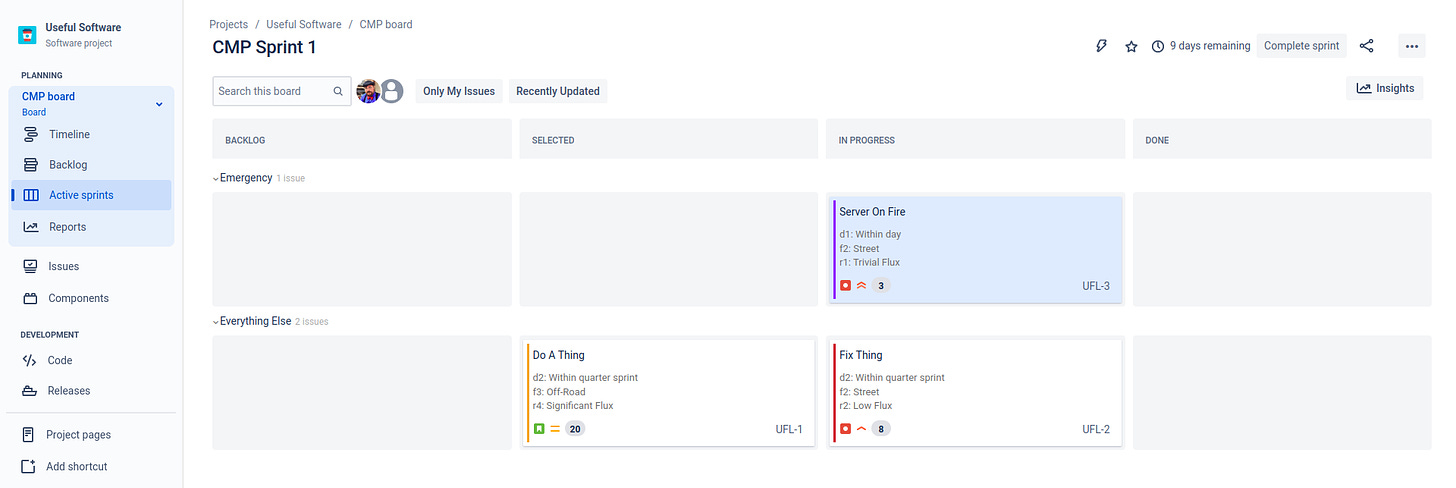
Click “Swimlanes” at left. Set “Base Swimlanes on” to “Queries”, add the following Query:
Name: Emergency
JQL: status="p5: Emergency"
Click “Add”. This will call out “p5: Emergency” items in a separate Swimlane.
Now click the “Card colors” item at left, and set “Colors based on” to “Priorities”. (This will make the colors reflect Quantified Task Gravity.)
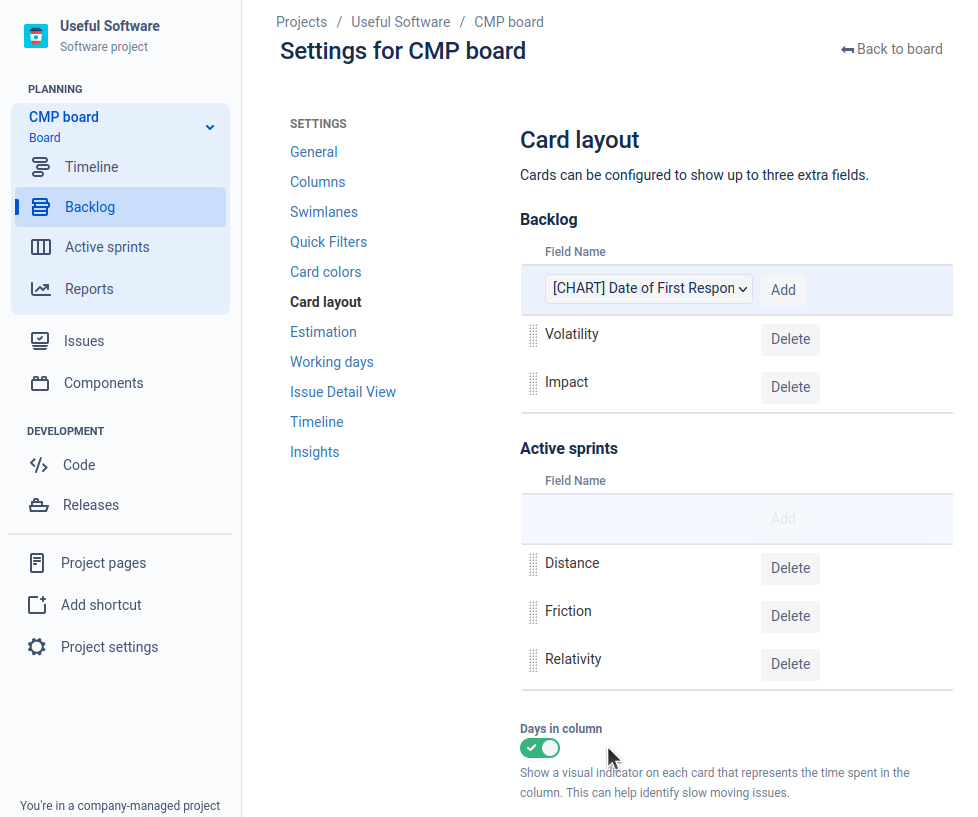
Select “Card layout” at left, and add the following fields to the card layouts:
Backlog
Impact
Volatility
Active sprints
Distance
Friction
Relativity
Finally, select “Estimation” at left, and ensure that “Energy Points” is selected. When you’re done, click “Back to board” in the upper-right.
The End Result
You now have Quantified Tasks fully integrated with your Jira company-managed projects.
There are a few key advantages to this technique:
The estimation metric is explicitly named Energy Points, and that is automatically calculated from Distance, Friction, and Relativity.
Quantified Tasks Priority and Status are intrinsically linked.
Your Jira Priorities directly correspond to Quantified Tasks Gravity.
Tasks marked “p5: Emergency” show up in their own swimlane.
Your estimation metrics appear front-and-center on your board.
Option 2: Team-managed Project
If you don’t have control over the Jira instance, or otherwise just want to use Quantified Tasks on specific projects, you can use Team-Managed Projects instead. Although this won’t give you as tight an integration with Quantified Tasks, it will still be good enough for your team to make proper use of the methodology.
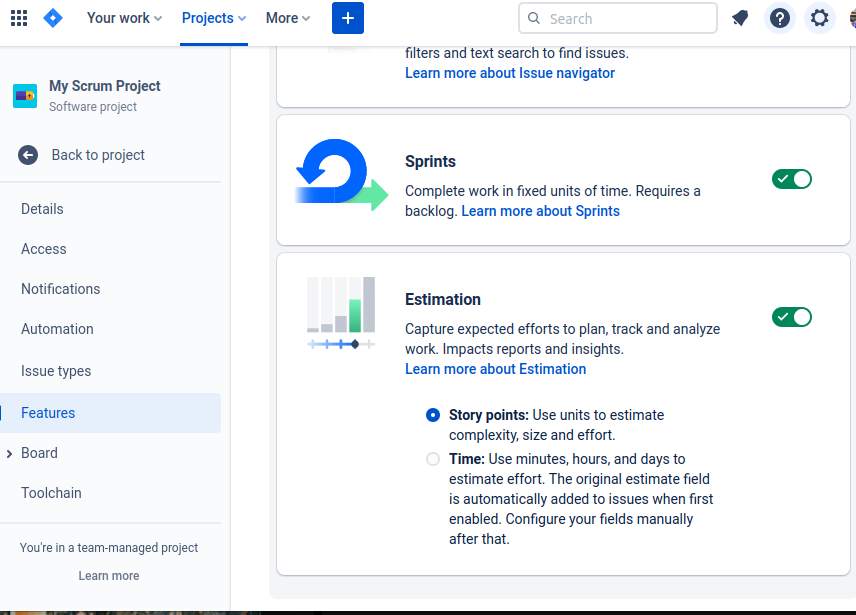
For a start, you will need to turn on Estimation in Story points mode. To do this, navigate to Project Settings → Features, enable Estimation, and select Story points. For best results, also enable Backlog, Reports, Sprints, and Releases.
Issue Types
Under Project Settings → Issue types, ensure you’ve defined the following issue types at a minimum:
Epic
Bug
Story
Task
Subtask
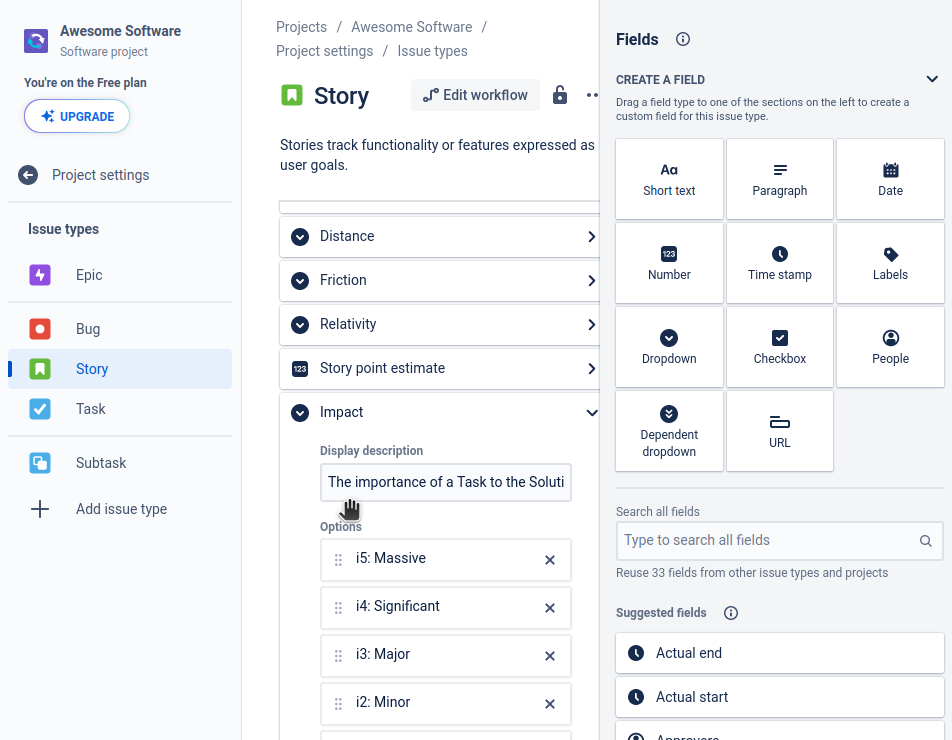
For Bug, Story, Task, and Subtask, you will want to add the following custom fields. You may be able to add them from your global configuration if you set up company-managed project support for Quantified Tasks, or else you can create them here.
NOTE: If you have also configured the custom fields at a global level, you should append each of these field names with “:” to avoid a name collision that could break automation.
Dropdown
Field name: Impact
Display description: The importance of a Task to the Solution as a whole, with an emphasis on the effect on users.
Options:
i5: Massive
i4: Significant
i3: Major
i2: Minor
i1: Slight
Dropdown
Field name: Distance
Display description: The estimated time to complete if you knew everything.
Options:
d1: Within day
d2: Within quarter sprint
d3: Within half sprint
d4: Within sprint
d5: Exceeds sprint
Dropdown
Field name: Friction
Display description: Based on available resources to help complete the Task.
Options:
f1: Highway
f2: Street
f3: Off-Road
f4: Trail
f5: Jungle
Dropdown
Field name: Relativity
Display description: How much uncertainty, or "flux," is in the Task.
Options:
r1: Trivial Flux
r2: Low Flux
r3: Moderate Flux
r4: Significant Flux
r5: Total Flux
Move the “Story point estimate” field that Jira added (from the Scrum template) up to sit below Distance, Friction, and Relativity.
If Priorities were globally configured to map to Gravity (which is strongly recommended!), you can use Jira’s built-in Priority field. Otherwise, you’ll need to create a Gravity drop-down like this:
Dropdown
Field name: Gravity
Display description: The importance of a Task in relation to a Release.
Options:
g5: Critical
g4: Significant
g3: Major
g2: Minor
g1: Trivial
Additionally, on the Bug issue type, add these three fields:
Dropdown
Field name: Origin
Display description: The phase at which the issue was introduced.
Options:
o1: Planning
o2: Design
o3: Implementation
o4: Verification
o5: Production (set as default)
Dropdown
Field name: Caught
Display description: The phase at which the issue was first detected.
Options:
c1: Planning
c2: Design
c3: Implementation
c4: Verification
c5: Production (set as default)
Number
Field name: Volatility
Default number: 0
In general, we recommend the following order of context fields (as appropriate):
Status
Assignee
Sprint
Distance
Friction
Relativity
Story point estimate
Origin (bug only)
Caught (bug only)
Volatility (bug only)
Impact
Priority / Gravity
Fix versions
Labels
For Epic, the Context fields should be something like the following:
Status
Impact
Priority / Gravity
Fix versions
Labels
Statuses
Jira Status maps to Quantified Task Priority. To configure the workflow and statuses, click “Edit Workflow” from any issue type under Project Settings → Issue types.
Create the following statuses:
pT: Triage
Category: To do
Allow issues in nay status to move to this one: Yes
p0: Backlog
Category: To do
Allow issues in nay status to move to this one: Yes
p1: Eventual
Category: To do
Allow issues in nay status to move to this one: Yes
p2: Later
Category: To do
Allow issues in nay status to move to this one: Yes
p3: Next
Category: To do
Allow issues in nay status to move to this one: Yes
p4: Now
Category: In progress
Allow issues in nay status to move to this one: Yes
Closed
Category: Done
Allow issues in nay status to move to this one: Yes
At minimum, you should create a transition between “Start” and “pT: Triage”. You can create transitions other if you wish, but in general, we recommend allowing free motion between statuses.
You may also consider creating a few Rules preventing transitioning a task to p3, p4, or p5 without it having a Story point estimate value.
Now click “Update workflow”. When prompted, ensure that all five of your issue types are selected, and click “Save and continue”.
On the “Review columns and statuses on the board” window that appears, create the following columns with the given statues:
Backlog
p2: Later
p1: Eventual
p0: Backlog
pT: Triage
Selected
p3: Next
In Progress
p4: Now
Done
Closed
Click “Save and close”, and then close the Workflow editor.
You will notice that we didn’t create a “p5: Emergency” status! This is because team-managed projects in Jira do not support Swimlanes on Boards. Thus, you should instead create an “Emergency/p5” label that you apply to any “p4: Now” tasks which you want to mark as an emergency.
Automation
To automatically calculate Energy Points and Volatility, from the gear menu in the upper-right corner of Jira, select “System”.
NOTE: If you appended your custom field names with “:” to avoid name collisions with global custom fields, be sure to account for that when creating the rule.
Energy Points
Under Automation, click “Create rule”.
WHEN: Field value changed for:
Fields to monitor for changes: Distance, Friction, Relativity
Change type: Any changes to the field value
IF: Add a condition
Issue fields condition
Field: Distance
Condition: is not empty
Issue fields condition
Field: Friction
Condition: is not empty
Issue fields condition
Field: Relativity
Condition: is not empty
THEN: Add an action
Create variable
Variable name: distance
Smart value: {{issue.Distance}}
Create variable
Variable name: friction
Smart value: {{issue.Friction}}
Create variable
Variable name: relativity
Smart value: {{issue.Relativity}}
Edit issue
Additional fields: (Set to code below)
{"fields": {"Story point estimate": {{#=}}{{distance.charAt(1).asNumber}} * {{relativity.charAt(1).asNumber}} + {{friction.charAt(1).asNumber}} * {{relativity.charAt(1).asNumber}}{{/}}}}
Name the automation “Energy Points” and click “Turn it on”.
Volatility
Under Automation, click “Create rule”.
WHEN: Field value changed
Fields to monitor for changes: Impact, Origin, Caught
Change type: Any changes to the field value
IF: Add a condition
Issue fields condition
Field: Impact
Condition: is not empty
Issue fields condition
Field: Origin
Condition: is not empty
Issue fields condition
Field: Caught
Condition: is not empty
THEN: Add an action
Create variable
Variable name: impact
Smart value: {{issue.Impact}}
Create variable
Variable name: origin
Smart value: {{issue.Origin}}
Create variable
Variable name: caught
Smart value: {{issue.Caught}}
Edit issue
More options
Additional fields: (Set to code below)
{"fields": {"Volatility": {{#=}}{{caught.charAt(1).asNumber}} * {{impact.charAt(1).asNumber}} - {{origin.charAt(1).asNumber}} * {{impact.charAt(1).asNumber}}{{/}}}}
NOTE: If you appended your custom field names with “:” to avoid name collisions with global custom fields, be sure to change
"Volatility":in the code above to"Volatility:":
Name the automation “Volatility” and click “Turn it on”.
The End Result
This should be enough to use Quantified Tasks with your team-managed project. Although it doesn’t have as tight an integration with the methodology as a company-managed project does, it works pretty well. (I’ve run a large project this way myself!)
Feedback Welcome!
If you have any questions or suggestions for improvement on using Quantified Tasks with Jira, please leave a comment. Happy issue tracking!


